 Lancia Gamma Consortium
|
|
|---|
|
|
|---|
Many new Gamma owners buy their car knowing little or nothing about it, perhaps having never seen one before. Most are not aware of it's mechanical layout and servicing requirements and end up having to learn "the hard way". This guide has been produced to avoid each new owner making the same mistakes as those before them and to answer some of the more commonly asked questions.
The information is aimed at all Gamma owners and so parts may appear to be common sense to some whereas others may find some sections to be too technical. It is aimed for the enthusiast to carry out his (or her) own work rather than the professional, but it may help a local garage to repair and maintain your Gamma.
Most parts are unique to the Gamma and with a few exceptions cannot be bought off the shelf at Halfords and the like. However, most parts can be replaced, repaired or refurbished if you know where to ask!
This guide has been produced as an aid to Gamma owners based on the experience of others. Whilst we have tried to ensure that the information given is correct, neither the Gamma Consortium nor any of the contributors towards this guide give any guarantee that the information is free of error and cannot accept any responsibility for the results of following contributor's advice.
Click on the images below or use the links in the 'Contents' list to get more information
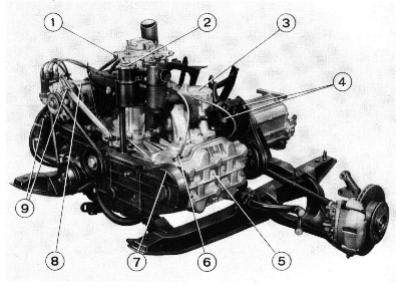
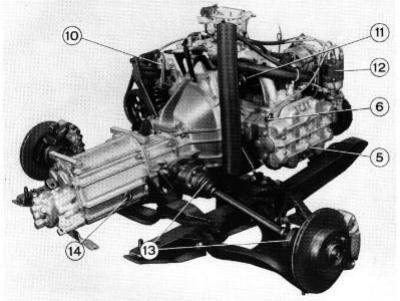
| 1. Fuel filter inspection plug | 8. Alternator |
|---|---|
| 2. Oil filler cap | 9. Alternator anchorage |
| 3. Oil filter | 10. Clutch release lever |
| 4. Power steering pump anchorage | 11. Starter motor |
| 5. Cylinder head cover | 12. Ignition distributor |
| 6. Spark plugs | 13. CV joints guards |
| 7. Valve gear drive belt cover | 14. Gearbox/diff. oil level check/filling plug |
1. Cam Belts
Gammas have an unenviable reputation when it comes to their toothed camshaft drive belt, and not without reason! The camshaft serving the nearside (left- hand) pair of cylinders also drives the power steering pump. A lack of development, in early cars in particular, showed itself when unsuspecting owners would start their Gammas on a cold morning with the steering on full lock. This would cause the cambelt to break / jump with the load from the steering pump, resulting in one pair of cylinders firing-up whilst the other pair tried to destroy themselves, at the least causing bent valves. Later models have revised belt tensioners, but are still known to suffer from this problem.
The solution? At the least, it is a good precaution to park leaving the steering in the straight-ahead position. Cam belts should be changed regularly. A special tool is available for hire from the Lancia Motor Club tool library. Lancia recommended every 36,000 miles or 3 years, but considering the relatively low cost of a pair of new belts (about £25-30), many owners change them every 12,000 or even 9,000 miles. The only positive way to solve the problem is to move the pump to the front of the engine and to take its drive from the crankshaft pulley (using the pulley groove intended for the air conditioning pump). A cheaper, less technically elegant, possibility is to slacken off the 'V' drive belts to the steering pump, causing them to slip under load. Hardly entirely satisfactory, but if it saves your engine...?
2. Lubrication
All Gammas need a good quality oil and it needs to be changed regularly. Most engine parts do not wear prematurely, but one exception is the camshaft lobes. When the engine is stationary, oil will drain from the camshaft into the sump, and there is a delay when re-starting the engine before lubrication returns. A synthetic or semi-synthetic oil is preferable, as it has a greater film strength, and should be changed, with a new filter, every 6,000 miles. If a mineral oil is used, it should be changed every 3,000 miles.
A full oil change, including the filter, will need 6.1 litres of oil. It is better to use the dipstick than to rely upon the dashboard gauge to check the level. Remember also, you can build-up a little oil pressure by turning the engine with the low tension lead to the coil pulled off (the bottom one on the coil), thus filling your new oil filter and saving a few microns wear off your precious camshaft lobes. Don't despair if your cam lobes have worn, as they can be rebuilt and reprofiled to as good as new.
The Gamma oil filter is as per that fitted to Daimler/Jaguar V12s. The Tecnocar R-71 is highly recommended, but alternatives (with non-return valves) include the FIAAM FT 4875, TJ FB2086 and Coopers Z509A. The latter is expensive, but is a good, foam packed filter capable of cleaning particles down to just a few microns. It looks small and is expensive, but it will do the job. All of the above mentioned oil filters are now obsolete but can still sometimes be found from NOS (New Old Stock) suppliers. From the currently available oil filters, possibly the best replacement filter for the Gamma is the Mann W930/13. It is an excellent filter intended for several Aston Martin, Bentley, Jaguar and Rolls-Royce cars. It has the essential, for a Gamma, anti-drain valve and a very low pressure bypass valve opening which is also important in the Gamma.
Another common Gamma ailment lies in the cooling system, as overheating and head gasket failures can recur frequently. The use of cast iron liners with an alloy block is not uncommon, but in the case of the Gamma, the liners tend to 'sink' into the alloy of the block, causing gasket failure. This can occur not only at the head / block joint but also at the paper gasket joint at the base of the cylinder liners, allowing water into the sump. The usual signs are loss of water, often gradual at first, and a milky residue on the oil filler cap (although the latter can be caused by condensation within the sump in cars that have only short runs and do not warm-up fully).
The Gamma takes 9 litres of coolant and it should be mixed 50:50 water:anti- freeze. A good quality antifreeze containing corrosion inhibitors should be used, such as Fiat Paraflu, Unipart or Bluecol. Remember before flushing and refilling to put the heater on beforehand, with the engine running (to allow the vacuum-servo controls to work). After refilling, run the engine and top-up the expansion bottle as necessary as air is expelled from the system.
Note that all Gammas should have a T-piece connector at the top of the radiator with small diameter hoses going to the top of the inlet manifold and to the expansion bottle to allow air to escape. This was not fitted to early cars, and air within the radiator became trapped. Blockages in the small diameter hose can cause the same problem leading to a build-up of vapour in the system.
Water pumps often fail after about 10 years or so, their worn bearings emitting a deep rumble. However, Betacar Ltd. sell exchange pumps for £80 + VAT, providing the old unit can be reconditioned.
`Big end' bearings have been obsolete for a long time now, but Vandervell 6364 bearings can be modified to do the job. Mains are also getting rare, but still turn up.
5. Ignition
Spark plugs can be obtained from most car accessory shops (e.g. Halfords), and can be either:
NGK BPR6ES
Bosch WD5C
Champion N6YC
The correct gap width is 0.6-0.7mm (0.024-0.028")
The ignition timing should be 29 degrees BTDC at 3000 RPM with the vacuum hose disconnected. The timing marks are stamped on the flywheel teeth and are visible (just) from the nearside of the car through a small aperture in the bell housing.
The Bosch distributor and electronic ignition rarely give trouble, but rotor arms are common and are readily available. See Jack Romano about distributor caps - he's got boxes full! Plug leads are also easy to replace, but the 'mexican hat' caps which prevent water and foreign bodies falling into the plug holes should be retained if in good order. Wiping the long leads with a clean rag using a water repellent such as WD40 will help to prevent misfires due to shorting-out. Similarly, don't use heavily suppressed leads as this is measured as resistance per metre length, i.e. the longer the leads, the greater the overall resistance and the weaker the spark.
6. Drive Belts
Ferodo equivalents for Gamma drive belts are as follows:
Alternator VS1016 Power Steering VS690 (also Quinton Hazell QBA687) Air Con. VS1092
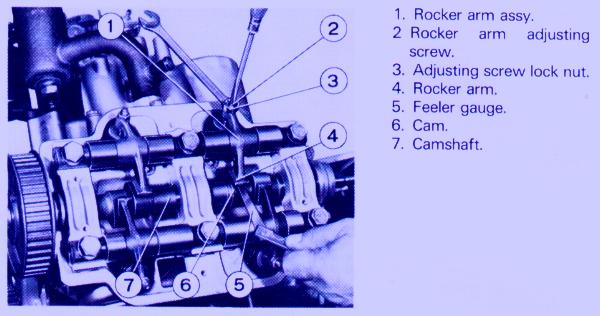
Valve clearances (measured cold) are:
0.30mm (0.012") inlet 0.35mm (0.014") exhaust

Manual gearboxes are usually reliable if the oil is changed regularly, i.e. every 12,000 miles. The oil drain plug is situated at the back of the gearbox, whereas the oil level/filler plug is on the offside (driver's side) of the gearbox. Replacing the oil requires 3.4 litres of SAE 85W-90 gear oil poured into the level plug hole until it seeps out.
The automatic gearboxes are an Automotive Products (AP) design unique to the Series 2 Gamma and were not reliable, many being replaced under warranty having lasted only a few years. Most auto Gammas have probably been converted using the more reliable manual gearboxes by now.
The gearbox level should be checked every 6,000 miles using the dipstick. This can be done with the engine cold or warm as there are two sets of markings, but in both cases the engine must be allowed to run for at least one minute from cold (two minutes when the temperature is below 18 degrees C) or after a 5-10 mile run if warm. In both cases, the reading must be taken within 60 seconds of switching off. Remember to use a nylon cloth to wipe the dipstick, to prevent fibres clogging the transmission valves.
The recommended interval for changing the transmission fluid (3.9 litres of ATF Dexron 2) is every 18,000 miles, although given the gearbox's reputation it would be prudent to change it more often. Look for tiny flecks of black which may indicate band wear - if allowed to accumulate they may block a valve.
3. Clutch
The clutch friction disc can be replaced by Beta Volumex or Thema ones which are also significantly cheaper. There are plenty of pressure plates about, but later series clutch release bearings are getting rare.
1. Tyres
The correct tyre size for the early models with 14" alloys is 185/70HR14. For later Series 2 15" alloys, 195/60HR15 tyres were fitted, usually Pirelli P6s which are no longer manufactured.
The correct cool tyre pressures for normal use are 1.8 bar (26 psi) both front and rear. For high-speed use or when fully laden, 2.1 bar (30 psi) is recommended.
The alloy wheels are frequently overtightened, particularly by tyre centres and the like using their air tools. This can cause damage to the wheel bolts or the alloys themselves and may induce vibrations or 'wheel wobble'. The correct torque figure is 65Nm (48 lb ft).
When refitting, it is worthwile to smear a little grease such as 'Coppaslip' around the centre of the inside face of the alloy where it fits over the hub. Corrosion at this point can otherwise cause the wheels to attach themselves to the hubs.
Original UK-manufactured SKF front bearings are no longer available as a separate item, so you will have to buy a kit Ref. AVK260 which contains the correct SKF 633007A bearing, at a cost of around £50.
4. Brake Discs
The minimum overall thickness of the discs should be 17.3mm at the front and 9.0mm at the rear. Brake pads are usually available from car accessory shops or motor factors as they are common to other cars, the design being the Girling "collette".
The price and availability of genuine Lancia front brake discs is a problem. Citroen CX ventilated front discs are about half the price and can be machined to fit by reducing the diameter, taking 0.5mm off each face and re-drilling the bolt holes to the correct Lancia size. Nissan Laurel discs are said to have the same stud pattern as the Gamma and can be adapted to fit with little work.
5. Struts
Replacement strut inserts were manufactured by Koni and Monroe, but are becoming difficult to find as stocks are used up and not replaced. If new inserts can be found, replacement will require the removal of the original damper assembly from inside the casing. This requires the removal of a large threaded nut at the top of the casing, and a tool for this can be borrowed from the Consortium which works on the rear struts (and possibly the fronts).
One problem area here is the strut top plates which accumulate road dirt, salt etc. and were poorly painted when new and may corrode badly. As they are difficult to inspect, the first sign of something wrong is usually when the rubber bump stops drop off and are left to bounce around inside the coil springs. Repair is difficult, as they were formed by welding awkward-shaped pressings together.
When replacing the rear struts, new lower bolts and lock nuts should be used, as the originals have been known to become bent, (probably due to the high lateral cornering forces that a Gamma is capable of).
An excellent imitation is available from 'Woolies' (01778 347347) in mink (brown) or black, part code 264. You will need about 19 feet per side for a coupe at a cost of around £3.50 a yard.
Electric windows were standard on all Gammas (including the rears on the saloon) but were always slow in operation. If a window will not work at all, it is worth trying to clean the switch contacts first (the switches can be carefully prised apart from the top to expose the contacts). Otherwise, good used motors and regulators may be needed.The front and rear screens are bonded to the bodywork on both models and are expensive to have replaced. Secondhand windscreens will cost around £50-100 if you can find one, but new screens are likely to be over £400 fitted.
3. Fuel Pumps
Very early S1 cars used an electric fuel pump. This was replaced with a mechanical unit for all later carburettor models. The mechanical pump is no longer available, but alternative solutions are to convert your car to an electric pump or to buy a Beta mechanical one and swap the pivoting arms - the Gamma one is longer and has a different shape.
The S2 cars with fuel injection reverted to an electric pump once more and a new pump from a Lancia dealer will cost around £200. The Bosch pump fitted to the 4.2 Jaguar XJ6 appears to be the same but costs about half as much.
4. Body Panels
Gammas don't suffer from corrosion as badly as some of the earlier Lancias, but even so even the youngest cars will be over 10 years old by now. Repair panels from motor factors are not available, but some new body parts can still be bought from specialists such as the Gamma Consortium or Betacar. Coupe parts are rarer and more sought-after and thus command a higher price whereas saloon parts such as new doors, wings and bootlids are more readily available and thus less expensive. Otherwise, some parts such as front wings, doors, bonnets and bootlids may be available second-hand, particularly the stainless steel trim to the doors and windscreens.
Coupes tend to rot around the front and rear screens (especially the rear), around the wheelarches and the back panel. Saloons go around the A-pillars and along the body where the stainless trim fits. Keep an eye on these areas and apply plenty of Waxoyl.
5. Exhausts
Mild steel parts still turn up occasionally. It's a case of ringing around and buying each section as it becomes available. If you pay Lancia list prices, you will have to think big - about £700 from end to end!
Stainless steel systems are available, but some tend to suffer from a 'tinny' sound, especially when the muffled expansion box is omitted at the 4-into-one junction. However, they are usually very well made, come with a lengthy guarantee and they are getting cheaper at about £400, unfitted, and are available from Lancia specialists.
A wiring diagram for the Series 1 Coupe is available for download. Be warned, however, that it is a very large ZIP file (over 1.9Mb) containing scanned images of both the diagram itself and the key to the numbered components. This operation is likely to take a long time.
Click here to see a summary of the fuses and relays. Please note that this is for Series 2 UK models, and other variations may differ.
|
If you have questions, comments or suggestions about this website, please e-mail gcw@gammaconsortium.com
|